Robotrek Battle Mechanics
Robotrek is a rather obscure SNES RPG and has some pretty unusual mechanics for an RPG; this combination generally means that there isn’t a whole lot of accurate information on the internet about the actual combat mechanics. This page will cover the basic flow of battle, robot stats, status effects, RUN command, general battle mechanics, and ATB/turn order. For more specific numbers for enemy stats or equipment, please see the corresponding pages.
I have also spent a substantial amount of time making a damage calculator for this game, which can be found on the calculator page. That page also has details for how to use it, and details about the damage formulas behind the scenes.
Combat overview
Robotrek has a pretty unique but intuitive battle system. Much like Pokemon, your main character lets his pets (i.e. Robots) do the fighting for him. All of the encounters, except for some scripted fights, are visible on the overworld and physically bumping into an enemy sprite here triggers an encounter. How your character bumps into the enemy determines who gets initiative in battle; there are some guidelines for this but it gets somewhat complicated and also doesn’t appear to be 100% consistent. In general, if the game thinks you are trying to initiate battle (you are in the same row or column as an enemy and are the one that walks into it), then you get initiative. If the game thinks you are trying to avoid battle (the enemy walks into you while you’re facing away, or you try to run past the enemy offset by 1 tile) then the game usually gives initiative to the enemy. For scripted fights, the player always has initiative.
Combat itself is turn-based and takes place on a grid-based battlefield. Whoever has initiative is allowed to take action first. On the player’s turn, you can choose between several actions:
- Attack→RUN: Not to be confused with Escape, the RUN command allows the player to use pre-programmed combination attacks. For more info, see the RUN section below.
- Attack→Weapon: The other main offensive option is to simply attack with a weapon equipped on the robot’s left hand, right hand, or back. The range, damage, and consumed fuel all depend on the weapon itself. More info listed on the equipment page.
- Guard: Uses 5 units of fuel (
 ) and halves all damage dealt in the next turn.
 - Escape: Uses 5 units of fuel (). Robot attempts to flee the battle. If successful, the battle ends and the overworld enemy cannot trigger battle for a short period. If unsuccessful, the turn is wasted.
- Item: Uses 5 units of fuel (). This is listed as the player name in the menu. Using this, you can swap the current robot for the next robot in the cycle (if there is a 2nd or 3rd robot) or use items to heal your robot, remove status effects, damage the enemy, or force an escape.
In addition to enemies, there are sometimes capsules scattered around on the field. Hitting a capsule with a melee weapon (or a “Blow”-type weapon) will open it, for better or for worse. All options for capsules can be seen below.
After the robot/player takes action, an appropriate amount of fuel is drained and will gradually refill (see ATB section for more info). Until the ATB meter is full again, the enemies will continue to take action. This continues until either the player or all the enemies are defeated. If you are successful in battle, you are rewarded with experience points and a chance at a capsule drop. If all robots die during battle, you are sent back to the title screen.
Battle capsules 
A capsule’s position in battle and whether or not it spawns at all are based on the random number generator and can’t be reasonably manipulated. Hitting a capsule in battle with a melee weapon or a “Blow” class weapon will open it, with 5 potential results:
- Explosion: The capsules explodes and damages any enemy or robot nearby. Sometimes the explosion causes corrosion status.
- 0.5 Meg bonus: If you finish the battle before the timer expires, 0.5 Megs are added to the bonus experience total.
- 1.0 Meg bonus: If you finish the battle before the timer expires, 1.0 Megs are added to the bonus experience total.
- Energy restored: Full heal for the robot!
- Equip level up: All weapons currently equipped are increased in level by 1. Equipment already at level 9 is unaffected. This is the only means to level up bombs.
- Found Big Bomb: Adds a Big Bomb to your inventory.
When I initially looked into this, I determined that the chance of an exploding capsule was 50% and everything else was 12.5%. This omitted Big Bomb, though, and I have been unable to find what causes that result. I would guess that Big Bomb is also 12.5% and explosion is 37.5%, but I can’t back that up.
Experience points
The experience curve in this game is linear; you require 2.0 Megs of experience for the first level, and an additional 2.0 for every level beyond that. Upon winning a battle, you are rewarded with the enemies’ experience points and also some bonus experience if you finish the battle before the bonus timer in the upper right of the screen expires. There are several sources of bonus experience:
- Timer bonus: If the battle timer is 21 or greater, bonus experience = 0.3. If timer is between 11 and 20, bonus experience = 0.2. If timer is 10 or less, bonus experience = 0.1.
- Capsule bonus: If you open up a capsule and get the message “0.5 Megs bonus” or “1.0 Megs bonus”, the listed value is added to the total bonus experience.
- Melee attack bonus: For every melee attack that hits an enemy, you are given an additional 0.1 Meg bonus experience. Back attacks count double. RUN commands don’t apply this bonus.
Unfortunately, bonus experience stays static for the entire game, and is therefore mostly useless by the time you fight the second boss.
Capsule drop
Opening overworld capsules is your only means of gathering items or money in this game. Enemies don’t naturally award you with money, but they have a chance of dropping some (or an item) after battle. Drops are tied to an enemy formation rather than each enemy itself. A Spider/Spider/Spider formation has different drops than a Spider/Gel/Gel formation, even though both of these appear as a Spider on the overworld, and in-battle may also only contain a single Spider.
I hope to eventually upload maps with every overworld spawn labeled with its formation, but I can’t guarantee I’ll ever finish that.
I will be making a page with all of the enemy formations and their possible drops, but it is not a priority so I don’t know when it will finish. In short, whether you get a drop at all, and its contents, are random. There are three rarity tiers for drops: super rare is 1/256, rare is 1/16, and common is everything else.
Robot Stats
Robotrek is a unique game in that you can adjust your robots’ stats any time you have access to the Invention Machine (after you gain a level, or when you find an R&D room). You get a set amount of points (equal to [player_level * 10]+30) to distribute among the 5 stats as you please. A good understanding of the stats and how to change them makes playing this game substantially easier. All stats, their valid values, and a short description are included below:
- Energy (1-999): Energy is simply your robot’s maximum health. This does not change increase your current health (but will decrease your current health if you lower energy enough), so healing is required after adjustment. This stat changes nothing mechanics-wise.
- Power (0-99): As expected, this influences the amount of damage your robot deals. The power stat is used linearly for basic attacks, so an increase of 10 points here will generally lead to 10 more damage with a basic attack unless resisted by an enemy. However, the power stat is sometimes referenced multiple times during a RUN command, in which case every point is substantially more impactful.
- Guard (0-99): The guard stat reduces incoming damage to your robot, and also changes the appearance of your robot’s chestplate. If you find yourself taking a lot of damage from enemies, increasing the guard stat is the most efficient way to fix the problem (as opposed to adding more energy). This stat is also linear like power (until the guard stat is larger than 15/16th of the incoming attack power), so an increase of 10 points can expect to yield a drop in incoming damage by 10 points.
- Speed (0-99): By far the most important stat in the game, speed determines the hit rate and dodge rate of your robot. If your robot’s speed is equal to the target’s speed, the attack is guaranteed to hit. If the enemy has less speed than your robot, there is a chance that the attack will miss. More details will be given in the damage formula page.
- Charge (0-99): Charge is a very weird stat. In its most basic form, this value determines how quickly your ATB meter (fuel gauge?) will fill. There are some weird quirks with this stat, though; there’s a bit of a staircase function here where points will have an impact until a plateau, at which point the fill speed will be fixed for the next X number of points. This is explained substantially more in the ATB section below.
Status effects and special attack properties
There are not very many status effects in Robotrek, but they do exist and they can be rather crippling. Since the game (and my bestiary and equipment lists) treat them in the same manner, I’ll also cover some of the special attack properties that you will see in the game. For a list of the sources and chances of each status/property, please reference the Bestiary and Equipment pages.
One important thing of note is that, with the exception of critical hits and drain, all status effects or special attack properties can be applied even if the attack misses. However, a blocked attack (ting!) will never deal damage or apply status effects or special properties.
- Stop: Represented by
 . When stopped, your robot cannot move but can still take action. This also prevents use of the RUN command (not to be confused with Escape, which can still be used). Stop usually lasts for 1-2 actions, but can be refreshed before it wears off.
- Confusion: Represented by
 over the robot’s head. This causes the robot to move randomly and take random actions, and usually lasts for two turns. Confusion be refreshed before it wears off to lock the robot in confusion. While I’ve never seen it happen, it should be possible to accidentally damage the enemy while confused. Shield 3 grants immunity.
- Poison/Corrosion: Also represented by over the robot’s head. Corrosion never wears off unless the player uses a Clean or the robot dies. While poisoned, a robot takes damage in battle every 10 seconds regardless of whose turn it is or whether an attack is happening. The poison timer does not run while the player is in a menu. Poison damage is equal to [floor(current_HP/16) + 2], with a cap of 65 damage, and can be lethal. Shield 2 grants immunity to corrosion. Side note: Hammer 1 can technically apply poison status to enemies, but it does nothing; it never wears off but will never deal damage.
- Disable Item/RUN: The graphical indication for disable is a bit harder to see, especially for some of the attack animations, but the robot will glow red very briefly after being hit. When disabled, certain actions in the menu are unable to be selected; Disable RUN prevents the use of the RUN command, and Disable Item prevents all functions of the player menu (use of items, weather, big bomb, smoke, glasses, or robot swap). Due to a bug in the way the game tracks this status effect, Shield 4 will reduce the damage (to 1-2 damage) of any attack that successfully applies the disable status.
- Disable Random: This is the same disable status as above, except that the target of the disable is random as follows:
- R.Hand (22.2%)
- L.Hand (22.2%)
- Bomb (22.2%)
- RUN (11.1%)
- Escape (11.1%)
- Item/player menu (11.1%)
- Knockback: The target is hit to the last tile of the current row without changing facing. Shield 1 grants immunity to knockback.
- Drain: The attacker restores health equal to damage dealt.
- Fire/Ice/Lightning/Laser: These are the four elements in the game. Shield 4 will reduce these elemental attacks to 1-2 damage always, even on the final boss with 0 guard. Certain enemies also have weakness or resistance to particular elements or the entirety of elemental attacks. Specifics are listed in the Bestiary.
- Critical hits: By far most impactful property in the game. Critical hits will always hit (unless blocked), regardless of speed/hit rate, deal 50% increased damage, and ignore the target’s resistances. Critical hits are still mitigated by target guard stat.
Blocking
Blocking is kind of an oddball in this game. Blocking for enemies and for the player’s robots is fixed at a 25% chance, and is based off of the global frame counter (the number of total frames the game has been running). This is on a 32-frame cycle, where 24 frames will fail to block and the next 8 frames will succeed in blocking. As a result, if you block an attack whose animation is a multiple of 32 frames (such as Blacktank’s ramming attack), you are guaranteed to block all subsequent attacks.
Every enemy’s ability to block is listed in the Bestiary. Thankfully, only very few enemies are able to block (Knight/Master, the Pixies, Shell, and Big Fans) and Big Eye is the only boss with the ability to block. As for the robot, any piece of equipment that grants a defense bonus will also grant the ability to block. This includes: all packs except for power pack, all shields, and boots 3-6. Blocking is a binary property, so it doesn’t stack; a single piece of blocking equipment is sufficient for the full bonus.
RUN commands
This is going to be an excruciatingly exhaustive list of every RUN command combination possible, and will likely have its own video showcasing the attacks, so I’m unsure if it should just be on its own page. I’ll just list some of the more interesting ones now so I have something to work off of later. Also include damage formulas. RRR, RR, RXR, XRR, LX, XL, LRR (L gun), RLL (L melee), RX. Unless otherwise specified, the listings here assume melee weapon on R, ranged weapon on L, bomb on X, and that the combination is valid from an ATB perspective. (Obviously not finished yet; will be working on it)
ATB/fuel meter
Credit to Fred 
 for the help with reverse engineering the ATB!
Whenever you or your robot takes action, whether it is attacking, guarding, using an item, attempting escape, or swapping robots, your robot’s fuel gauge is partially depleted. The degree to which it is depleted depends on the action. The fuel gauge is 24 units large, plus 1 invisible unit that fills after the meter is graphically full. For all attacks and RUN commands, please refer to the Equipment page. For all other actions (guarding, attempting escape, using an item, or swapping robots), 5 units () of the total gauge is depleted. Once your fuel is maxed out and the enemy is idle, you regain control.
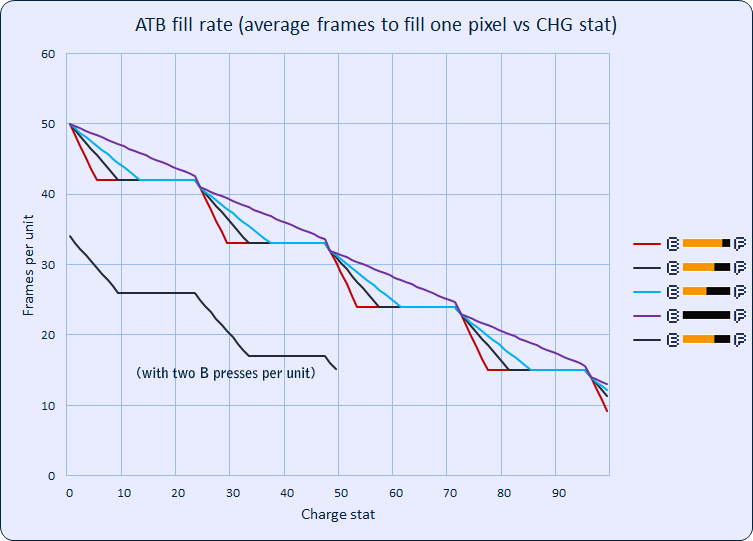
The rate at which the fuel gauge fills is rather strange, though. The number of frames (this game runs at 60 frames per second) that it takes for the gauge to increase by 1 unit depends on the robot’s charge stat and the rate at which the player presses the B button. The base rate of filling is 50 frames per unit, and is decreased by 9 for every 24 points put into charge (i.e. the base fill rate will be 32 frames per unit with a charge stat between 48-71). For each point into charge beyond the threshold, the fill time for a single unit is decreased by 8 frames. This bonus can only be applied once, however. As an example, attacking with Sword 1 costs 5 units of fuel ():
- With a charge stat of 24, every unit will take 41 frames to fill (41 + 41 + 41 + 41 + 41).
- With a charge stat of 26, 3 units will take 41 frames to fill and 2 units will take 33 frames to fill (41 + 41 + 41 + 33 + 33).
- With a charge stat of 47, all 5 units will take 33 frames to fill (33 + 33 + 33 + 33 + 33), and there is no additional benefit.
To make matters more complicated, every time the player pushes the B button, the fill time is reduced by 8 frames and the B button reduction is put on an 8-frame cooldown (i.e. pressing the B button more frequently than every 9 frames has no impact). However, the B boost is disabled when the robot’s charge stat is equal to or greater than 50. As a result, sometimes the fill rate with a charge stat of 50-80 is actually slower than a fill rate with a charge stat of 49 and B pressing.
The plateaus in this function have interesting consequences for building a robot, especially based on what attacks you intend to use. For instance, if you intend to build charge and intend to use primarily shot-type weapons, it would be wise to stop investing points once your robot has 9 charge. Until you have enough spare points to get to the next threshold of 24, you can temporarily use the points in other stats and take them back later.
Below is a graph illustrating this behavior for 4 of the most common ATB consumptions, with one additional curve showing the impact of pressing the B button just twice per pixel of ATB fill.