
Robotrek Battle Calculations
This page was intended to just serve as the host for the most current version of the Robotrek Supercalculator. However, I decided to upload a substantial amount of more notes and resources here just for completion’s sake. The Supercalculator is all-encompassing, so you need not worry about the details of these calculations; as long as you use the enter the proper values, the calculator will take care of everything for you. If you’re interested in what is going on behind the scenes, though, feel free to read on!
Robotrek Supercalculator
The current version of the Supercalculator (v1.1) can be found here: Supercalculator v1.1
If you plan to use this, I request that you please save a local copy to use since all changes are made live to this spreadsheet. If two or more people are using this concurrently, then it will become very difficult to use productively. To use the calculator (video demo coming later), simply change the values of the red outlined cells and the sheet will populate itself automatically. Raw enemy stats are outlined in blue, calculated enemy values are outlined in yellow, and calculated robot values are outlined in green. Please notice that several RUN commands are listed in green under the standard equipment damage values.
This spreadsheet has, in other tabs, a very brief outline of my robot stats and equipment with very brief notes for my speedrun route. There are also some consolidated spreadsheets for equipment and enemy stats, which might be useful in lieu of the dedicated pages on here.
Damage calculation: Order of operations
All of this information is already accounted for in the calculator, but it might be interesting to some of you. I am mostly including this information here so I can finally throw away the scattered scraps of paper that have my notes on this. Some of these steps, if they haven’t been discussed in the Combat Mechanics page, will be elaborated on further on this page in the order in which they are called in the calculation.
When it comes time to calculate damage, the game first pulls the “final” power of the attacker’s attack. For enemies, this value is the listed value in the Bestiary. For the player, this value is the Robot’s power + the weapon’s base power + the weapon’s level bonus + power pack (if equipped). Once this value is obtained, it is time to modify it! The game takes the following steps in order:
- Blocking check: If the defender is capable of blocking (listed in the Bestiary for enemies, or if the player robot has any defense-boosting equipment equipped), then there is a 25% chance that the incoming attack will be blocked. If the block is successful, the attack fails and all further steps are skipped.
- Back-attack boost: This is a strange one, and is elaborated on further below. Back attacks give a 25% damage boost.
- Critical hit bonus: Discussed more in the combat mechanics page. If the critical hit is successful, damage is increased by 50% and we skip to Step 7.
- Weakness/resistance modification: If the target is weak to or resistant to the incoming attack, it is applied now. No target can be both weak to and resistant to the same damage type. Weakness always applies a 50% damage bonus, but resistances can reduce the damage by 50%, 75%, or 87.5%.
- Ranged attack decay: The further you are from the enemy, the less damage a ranged attack will do. Every tile beyond 2 will reduce your attack’s power by 1/64 (minimum of 1). Graphics and more info can be found below.
- Speed check: This checks if the attack will connect with the target. The difference between the attack’s speed and target’s speed is compared to the RNG. If the attacker has equal or greater speed, the attack will connect. If the target is faster, it has a chance to dodge as shown in the calculator.
- RNG-based damage fluctuation: To make the numbers less static, the game will adjust the calculated damage value slightly based on RNG value.
- Defense-based reduction: The raw defense value of the target is subtracted from the attack’s power, though there is weird behavior at low values.
- GUARD command reduction: If the target is guarding during this attack (if the player’s robot chooses the GUARD command, or if certain enemies choose to guard), then the attack power is halved.
With this in mind, it is clear to see why critical hits are so powerful. Additionally, there are only three steps that can reduce incoming damage: resistance, defense, and GUARDing. Since our robot can only resist elemental damage (via Shield 4), and since we don’t do damage on turns where we are GUARDing, the only one way for us to reduce the damage from attackers is by putting points into guard and using defensive equipment. Defense becomes very inefficient as enemies get more powerful, and nearly impossible if a late-game enemy critically hits.
Back Attack Mechanics
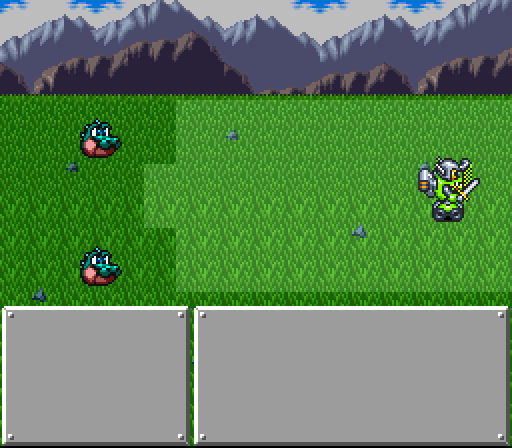
Contrary to what logic would dictate, back attacks in this game are actually not at all based on the proximity between attacker and target. The game instead just does a check on attacker and target facing. If both parties are facing the same direction and the attack connects, the game applies the back attack bonus of 25%. If the attacker and target are facing each other, regardless of positioning on the battlefield, the back attack boost is not applied. For most standard weapons that attack in front of our robot, we need to stand behind an enemy and face its back to get the back attack bonus. However, you can abuse these bizarre properties to get a back attack bonus while in front of an enemy while using sword 4 and sometimes bombs 2-4. It should be noted that these same principles also apply to enemies. If an enemy is in front of our robot and facing away, a full-screen attack will be boosted.
The facing exploit works in all cases for sword 4, but bombs 2-4 are a bit more particular. They hit every row, and the direction of the bomb strike depends on what direction your robot faces and whether or not there is currently an enemy in your row. If there is a single enemy in your row, all bombs will strike from the front of that enemy, regardless of where your robot faces. If your row is empty, the bombs will strike from the direction your robot faces.
In the below example, there is no enemy in the middle row, so these bombs will strike towards the robot’s facing, towards the right. This will incur a back attack bonus on both gators.
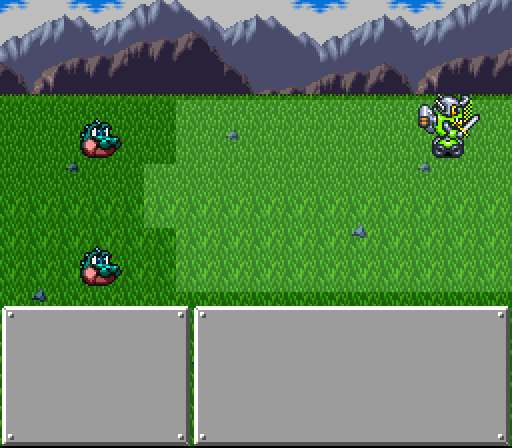
In this case, though, our robot and one gator are both in the top row. The bombs will all fire towards the left, even though we are facing right. Neither gator will take back attack boosted damage.
Weakness and resistance
This section only applies to enemies, as our robot cannot have a weakness, and is only able to resist elemental damage (via Shield 4). Through a programming bug though, that resistance doesn’t function properly, and instead reduces all elemental damage to 1-2.
Resistance
All enemies are able to resist any number of different attack “classes”: RUN, elemental, projectile, ranged blunt, and melee. The class of each piece of robot equipment can be found on the equipment page. As for the RUN command, all attacks used with the RUN command fall under this roof, with the exception of single-action programs (R, L, and X). A RUN program also overrides all other attack properties, and as such can be used to ignore resistances to some weapons such as sword 4. An enemy who resists elemental attacks but not the RUN command will take full damage from RR using sword 4.
An enemy only has one resistance value, and that is applied to every class that is resisted. It is not possible to resist RUN programs at 50% and resist elemental at 75%. All resistances and the resistance rate for all enemies are listed in the bestiary.
Weakness
Unlike resistance, enemies can only have a single weakness, and it is not restricted to attack class. Enemies can be weak, for instance, to just punch-type weapons, instead of the entire melee class under which roof “punch” resides. Enemies can also be weak to all ranged damage sources, which is a combination of “projectile” and “ranged blunt” classes. In one particularly baffling case, blade 2 is tracked as its own independent weapon type for the purposes of weaknesses.
As noted above, using the RUN command will override the class of the attack. As no enemy can be weak to RUN, this simply means that you forfeit any weakness advantage you may have had if you choose to use the RUN command. Unfortunately, most weaknesses are simply not worth taking advantage of.
Ranged attack decay
Ranged attack decay is a very simple mechanic, and is easily-observable. When using ranged attacks, the closer you are, the more damage it does. Sword 4 is exempt from ranged attack decay because it a completely overpowered weapon, but I believe every other non-RUN damage source has to deal with this.
For every tile beyond melee range (melee range is considered a distance of 1 or 2), the attack power is reduced by floor(1/64), with a minimum value of 1. This applies to both player and enemies. This really isn’t a big deal unless you are using a very weak weapon early on. For example, when fighting Meta Crab with our speedrun setup (shot 2 level 1, 36 robot power), our average damage value ranges from 16 (starting distance) to 24 (melee range). This is literally a 50% difference! As you get more powerful, the damage drop-off is less severe, but still notable. The calculator accounts for this of course, but only if you plug in accurate values for your spacing.
To more clearly illustrate how the spacing works, I have overlaid a grid over every battle scene in the game. See below for a sample picture, though the map pack has only the maps and grid (no enemies or robot). For those who are really interested in perfect accuracy of their calculations, feel free to download the map pack here. 
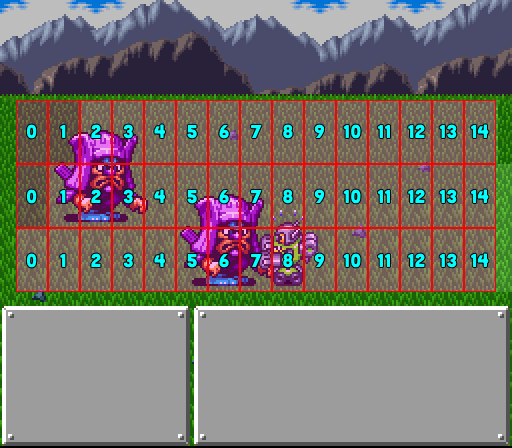
To find the distance between attacker and target, simply find the number for the tile centered on the enemy and robot, subtract them, and take the absolute value. If targets are on different rows, add 2 for each row separating them. In this picture, the bottom row Faceman is centered on tile 6, while our robot is on 8. The distance between us is simply 2. The middle-row Faceman is on tile 2, and offset by 1 row, so our distance is 8. If that Faceman was one row higher, the distance would then be 10. Most enemies in this game are 3 tiles wide, so it is pretty easy to find the proper tile. However, certain bosses and certain large enemies are actually 4 tiles wide, as pictured below.
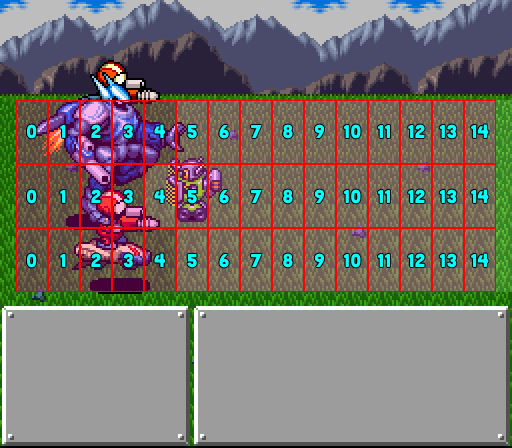
In this case, just pick the closer of the two tiles (or pick the “center” and round the distance down). Gateau is centered between 2 and 3 here, and our robot is on tile 5, so the distance is either 2 or 2.5 (which we’d just round down to 2).
If you don’t want to use the grids (understandably), you can pretty reasonably eyeball it. All enemies spawn on tile 2 (wide enemies spawn on 2.5 or 3), and we always spawn on tile 12, so our starting distance is usually 10. Even if you’re off by 1 or 2 tiles, the difference is usually not a big deal unless you are really min/maxing your stat builds.
Random damage fluctuation
At this point in the damage calculation, all non-defense modifiers have been applied. All appearances of the word “Power” in this section refer to that aggregate value resulting from these modifiers.
In this step, the game grabs one byte of the RNG and runs some comparisons to figure out how to adjust the attack power. The distribution of outcomes is as follows:
- 12.5%: +1/32 power
- 12.5%: +1/64 power
- 50.0%: Unmodified power
- 12.5%: -1/64 power
- 12.5%: -1/32 power
This fluctuation is generally not a big deal, but it does change the numbers enough to make them interesting. For speedrun purposes, it is very important to build my stats in such a way that I am guaranteed to never die from certain attacks and I am guaranteed to never fail to kill an enemy. In the calculator, the “min” and “max” fields in the damage calculations correspond to the ±1/32 cases.
Defense-based damage reduction
Much like in the RNG-based damage fluctuation section, all appearances of “attack power” or “power” refer to the final damage value of the attacker’s attack, after all position-based modifiers, weakness/resistance, and ranged attack decay. “Defense” is either the enemy’s guard stat, or our robot’s guard stat plus all equipment bonuses.
On the surface, this is a simple and boring step. X = Power – Target Defense. If X > Power/16, then we proceed as normal and that becomes the damage value.
If X < Power/16, then we get into Complication Land: Damage = Power/16 – [abs(X)/(Power/16)]. These are some pretty extreme diminishing returns. Until we reach Power/16, the defense mitigation is a 1:1 ratio. After that point, we need Power/16 additional points of defense for 1 additional point of damage reduction. Worse though, because the game takes abs(X), we need to double this threshold for the first point of reduction because we pass through X=0 on our way to X=(-Power/16). For example, with an attack power of 80, we can reduce the damage to 5 with 75 points of defense. To reduce the damage to 3, we now need a total of 90 points of defense. This phenomenon is illustrated below for an attack with 130 power:
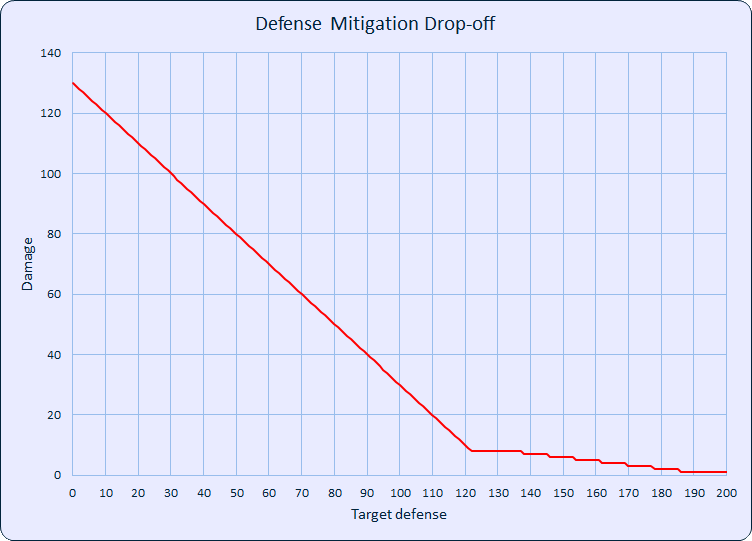
To make matters even worse, the game throws one more Hail Mary if you do manage to break below the Power/16 threshold: it pulls a byte from RNG and runs it through another function that I will frankly not bother explaining. If that secondary function returns certain values, the game completely overrides the damage calculation above and just sets it back to Power/16. In short, trying to reduce damage below Power/16 is wildly inefficient and also has a non-trivial chance of outright being ignored.